How To Create An Account in Axie Infinity Ultimate Guide
August 19, 2021
August 19, 2021
Ultimate Guide To Creating An Account in Axie Infinity
Creating an account in Axie Infinity requires a tedious process and a lot of trading navigation. In order for you to start playing the game you will need a lot of things. Here’s a quick list on What you need to start creating an account in Axie Infinity:
What Do I need to create an account in Axie Infinity?
- Verified Binance Account
- PC / Laptop
- Phone
- Government Issued Identification Card
- Money!!!
- Verified Email
- Meta Mask Wallet
- Ronin Wallet
What Do I Need to Create An Account in Axie Infinity?
First you will need to make sure you have a computer, a cellphone, a government ID, Google Chrome Browser and a valid Email Address. Once all of these conditions are satisfied you will need to Create a Binance Account.
Why Do I Need a Binance Account?
A Binance account will allow you to trade your currency and buy specific currency for any crypto game that you desire as long as it is listed. In this scenario you want to change your money to a universal currency which will allow you to purchase crypto currencies.
Creating A Binance Account
Go to Binance.com and create an account. You will need an email address and a Government ID to be able to verify your account. You will need to do everything on a desktop or laptop computer. You will need to have a cellphone by your side since Binance uses both email address and cellphone to let people access their account. Don’t worry this is an added layer of security. Once you’ve verified your Binance account you are ready to Start buying and trading Crypto Currency. Make sure you download the binance app on your computer and or cellphone.
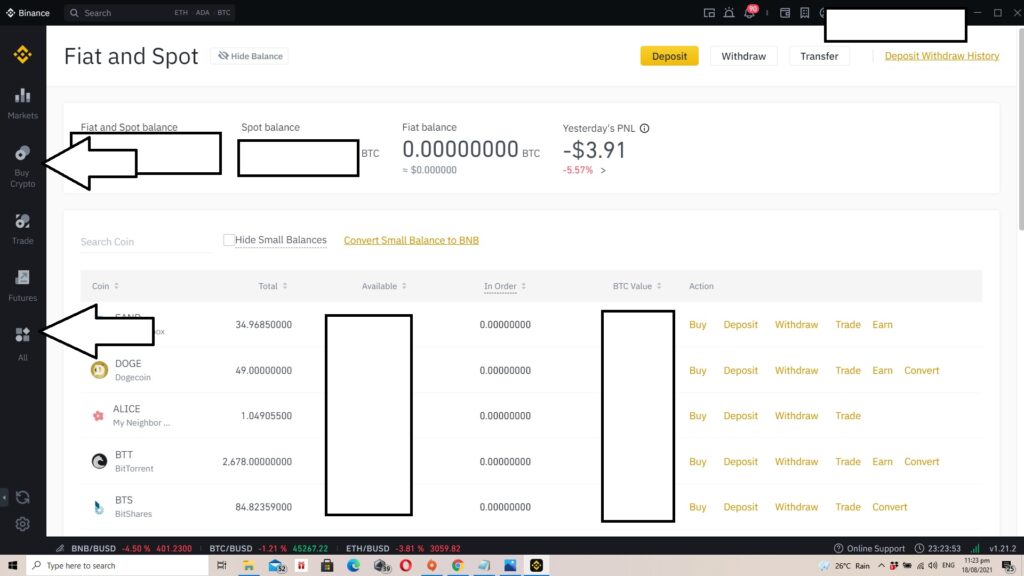
Buying Crypto Currency in Binance
Once your account is setup all you need to do is to buy a universal currency that will allow you to buy crypto currencies. In this example we will be buying USDT. Log in to your verified Binance account. Make sure you have your email address and cellphone ready to verify the login. Don’t forget to check your email and spam folder for the actual Binance verification email.
Buying USDT
Once logged in you will want to buy USDT since USDT is a universal currency that will allow you to buy other crypto currencies.
How To Buy Currency in Binance?
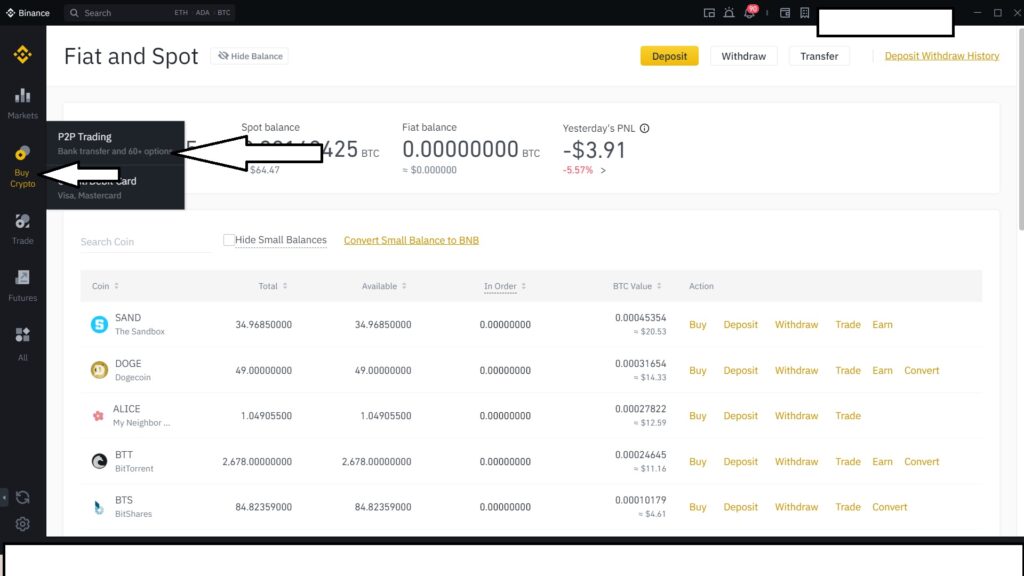
Here’s a step-by-step guide on how to buy currencies in Binance:
- Login to Binance
- Click on Buy Crypto on the upper left corner of your screen
- Select P2P Trading
This is assuming you will buy crypto using bank transfer or Gcash.
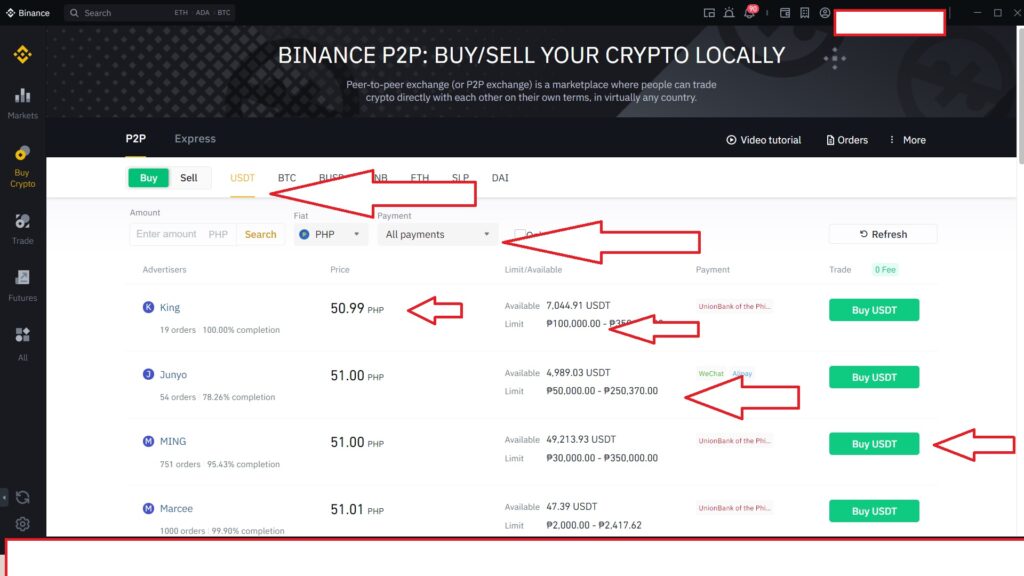
After clicking on P2P Trading you will need to set your currency to USDT. (This currency allows you to trade to any currency within Binance)
You can check or click the drop down All Payments tab to navigate between your payment method. I usally go for bank transfer or Gcash.
Pay attention to Price. Price is affected by how much supply the seller have. Each seller has a minimum amount called which can be seen in the Limit section. The first seller requires a minimum of Php 100,000 and a Maximum of Php 350,000. Once decided you can click on Buy USDT.
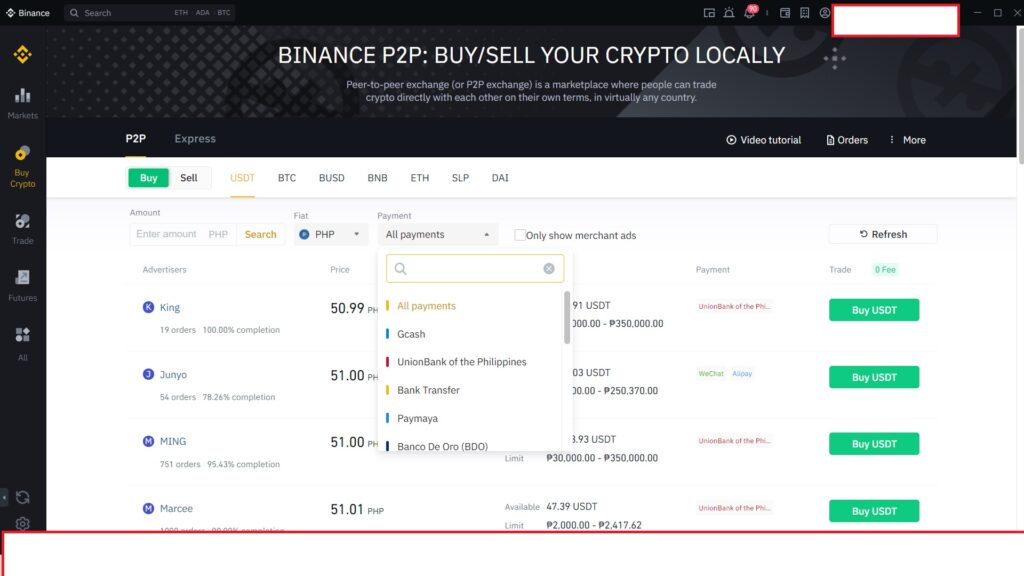
As mentioned above you can check between the payment options that you want to use for the transaction.
Now we can buy USDT.
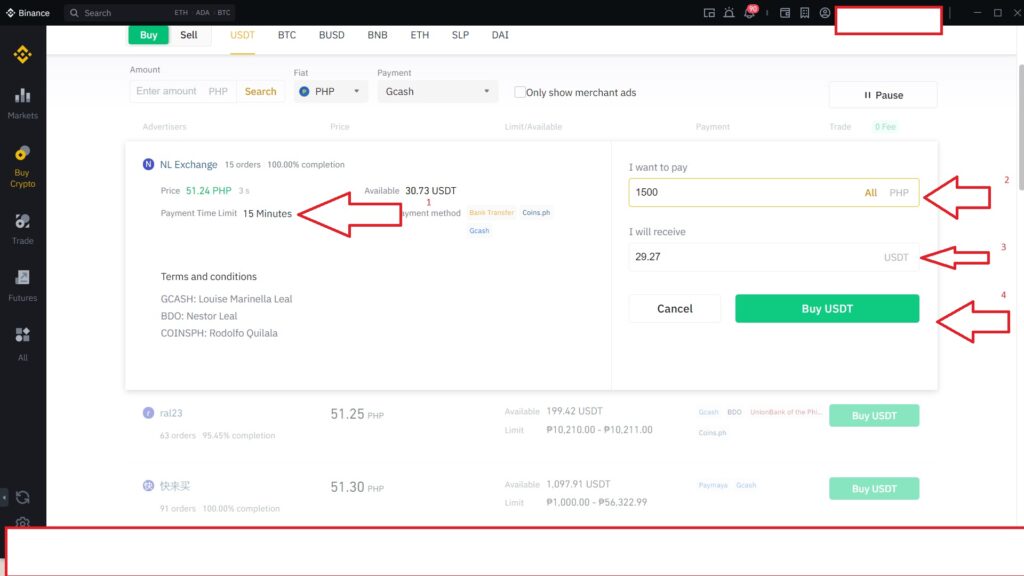
When Buying USDT there are four things you need to pay attention to:
- Time limit, you have to make the deposit before this timer expires. (This is why this should be done on a desktop and make sure your cellphone is with you at all times. You will need to send a screenshot of the actual transfer to the seller. Once sent the seller is given 15 minutes to transfer money in USDT to your account)
- I want to Pay tab. This is where you will input your actual budget in your local currency.
- I will receive tab. You can use this tab to specify how much USDT you want to buy using binance.
- Buy USDT button. Once everything is ready you can click this button to move on to the buyer-seller interface.
Let’s Buy USDT Now!
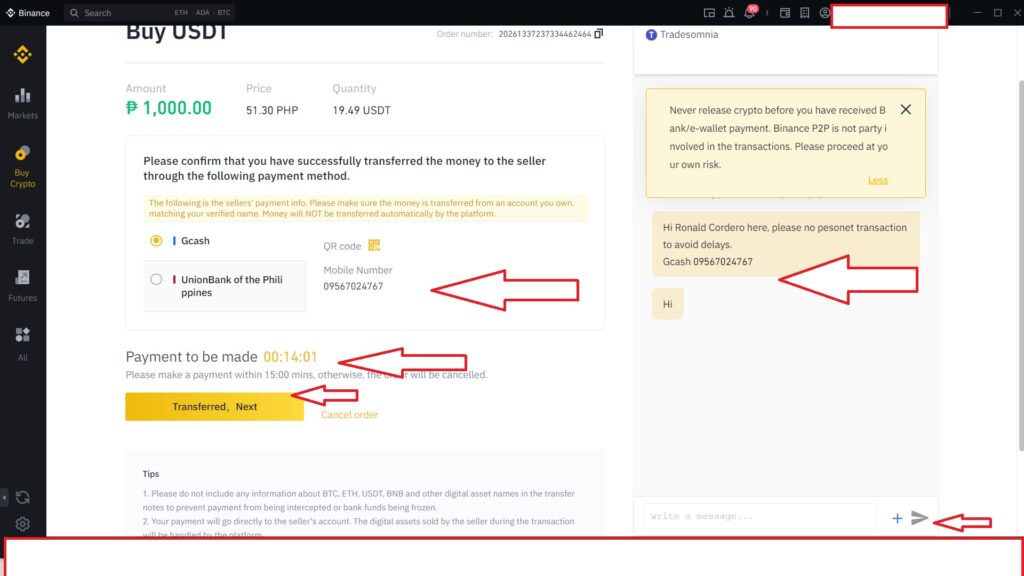
A couple of items you need to pay attention to when buying USDT or any crypto in binance.
Chat box on lower right side allows you to send messages to seller. Make sure seller is online.
Bank / Gcash / Mobile number and details are usually listed in this interface to help you find out where to send the amount. A timer is set for you to make the transaction so make sure you transfer within the given time.
Once you send a screenshot of the payment you can confirm the transaction by clicking in Transferred, Next.
Once that is done, you need to give the seller 15 minutes to make the transfer. You will get notifications via email, your phone and in the Binance App.
Once you get a confirmation that the money is transfer you can check your Binance Wallet under Fiat and Spot for the actual USDT currency.
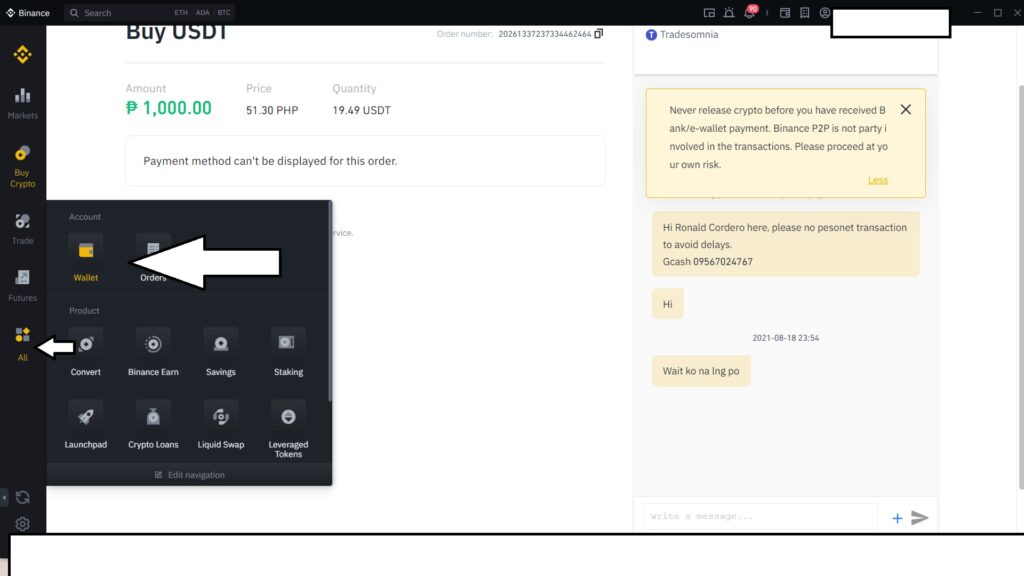
How to Check Your Currencies in Binance?
- Click on All
- Click on Wallet
- Select Fiat and Spot
- Scroll down to find the currency you purchased
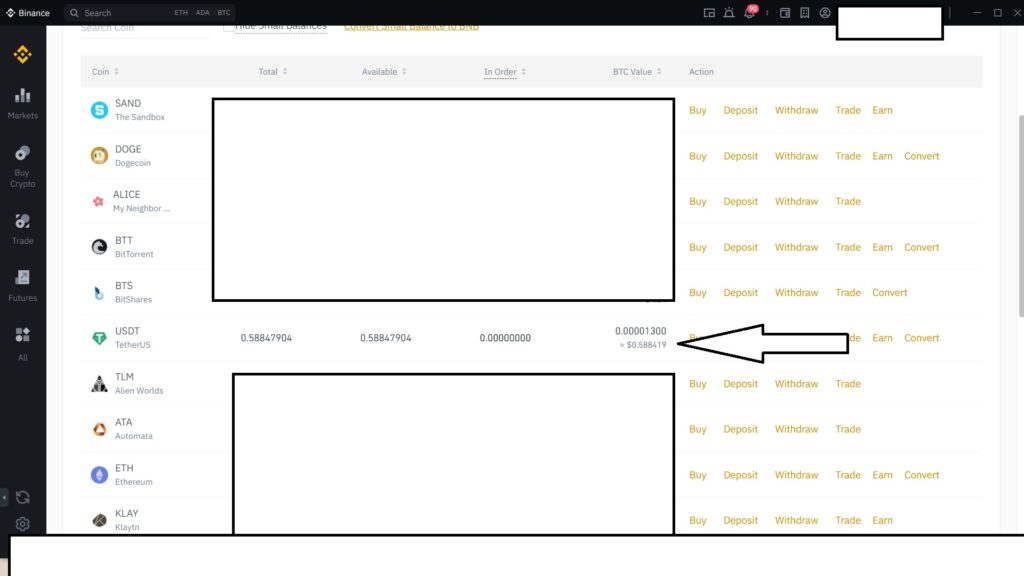
Now that you’ve confirmed the Currency is in your Wallet you can now focus on buying ETH which is the main currency you will by using to purchase items from Axie Infinity’s Marketplace.
Buying ETH on Binance
You will need to buy Ethereum within the Binance Trading Platform so you can transfer this to your Metamask Wallet and then to Your Ronin Wallet. We will get to those steps one-by-one.
Trading on Binance Platform
Yes you read that correctly. I will now teach you how to trade your USDT to Ethereum using Binance.
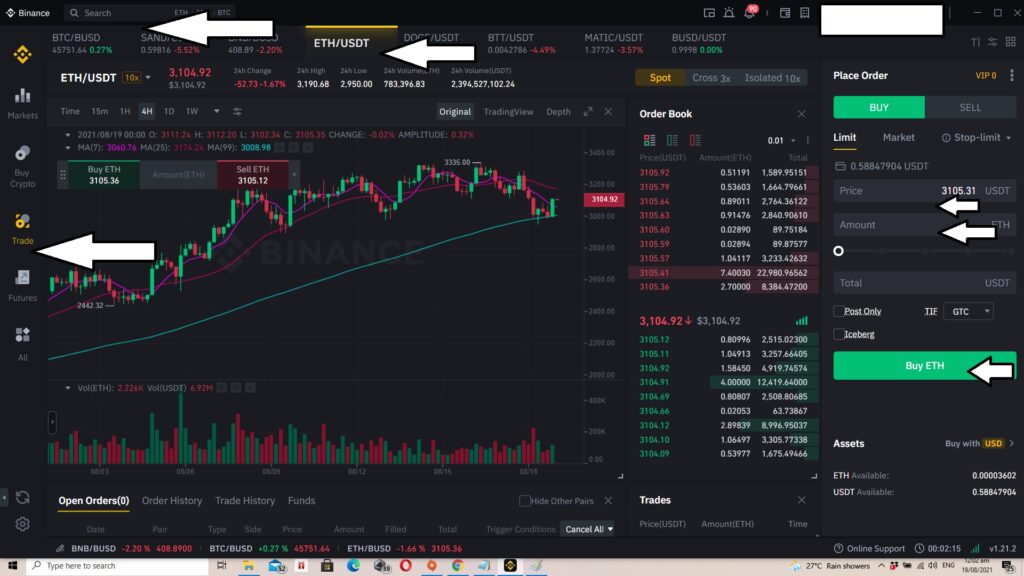
Click on Trade on the right side of the Binance Interface.
Select the Currency you with to exchange on top, You want to buy USDT to ETH.
On the right side you can either use Price to indicate the amount of USDT you wish to trade or use the Amount to select how much ETH you are buying. Once done you can click on Buy ETH.
This will trade your USDT to ETH. Once done you can go back to All >>Wallet >> Fiat and Spot >> and then check to see ETH in your Binance Wallet.
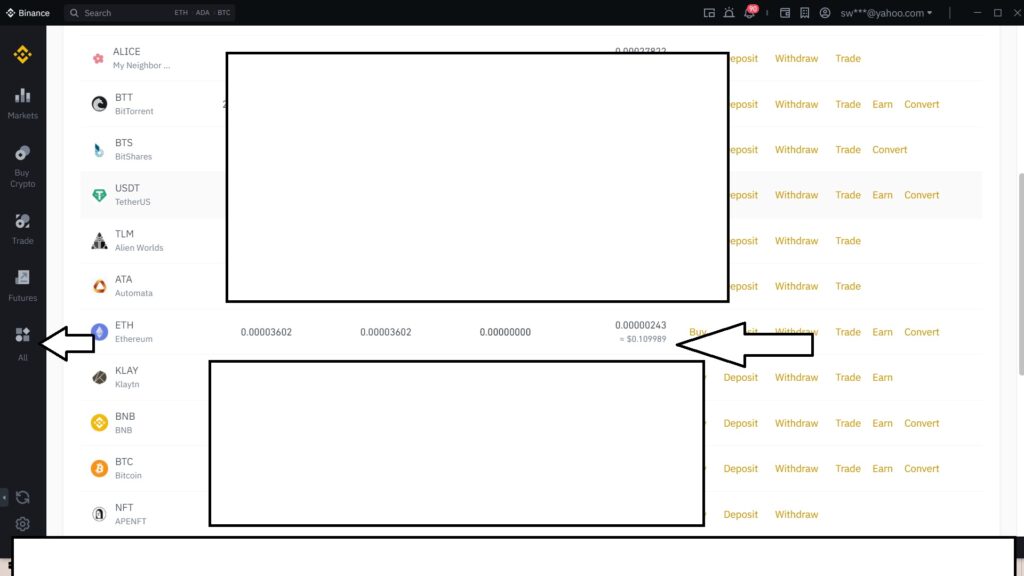
Ready to Create Account in Axie Infinity?
How To Create An Account in Axie Infinity?
Go to the Axie Infinity Marketplace. Remember to use this URL: https://marketplace.axieinfinity.com/. There is only one marketplace so make sure you check the URL carefully. Open Axie Infinity’s Marketplace using a Google Chrome Browser. You will need to used Google Chrome because you will be downloading Ronin Wallet and Meta Mask add-ons for your Chrome Browser. This will help you simplify verifications and logins in the future.
Make sure you save your information for all these sites:
- Binance
- Axie marketplace
- Ronin Wallet
- Meta Mask Wallet
Both Ronin Wallet and Meta Mask will give you unique:
- wallet address
- user name
- password
- seed phrase
You will need to save all those information and never share them with anyone.
Once in the marketplace you will need to sign up.
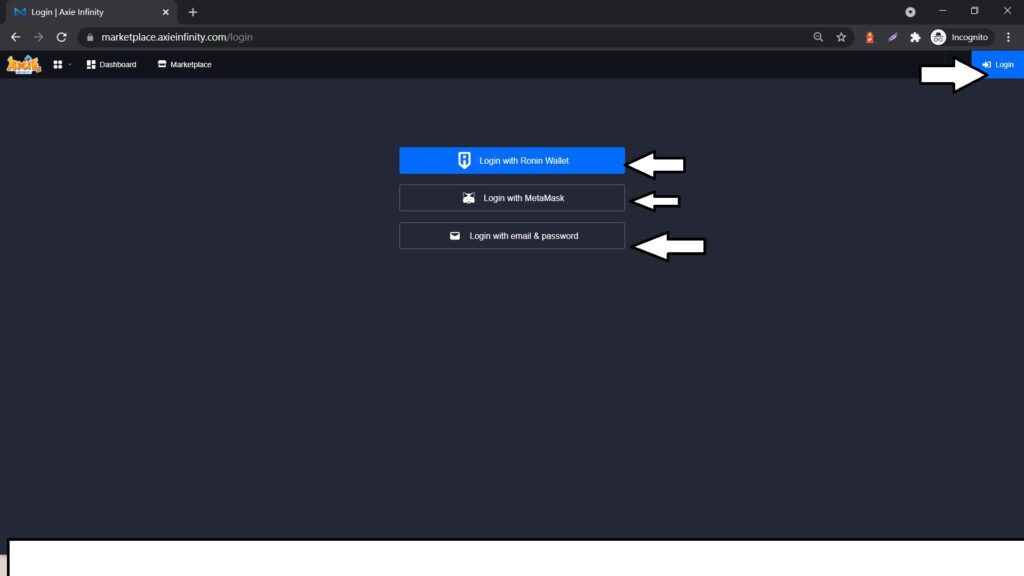
Sign up using all three options. Create Ronin Wallet Create Meta Mask Wallet and finally your email and password.
Save all your details.
Go back to Google Chrome and download the extensions for both Ronin Wallet and Meta Mask wallet. Then pin them on Google Chrome.

Once both Extensions are installed, you are now ready to transfer your ETH from Binance to Metamask.
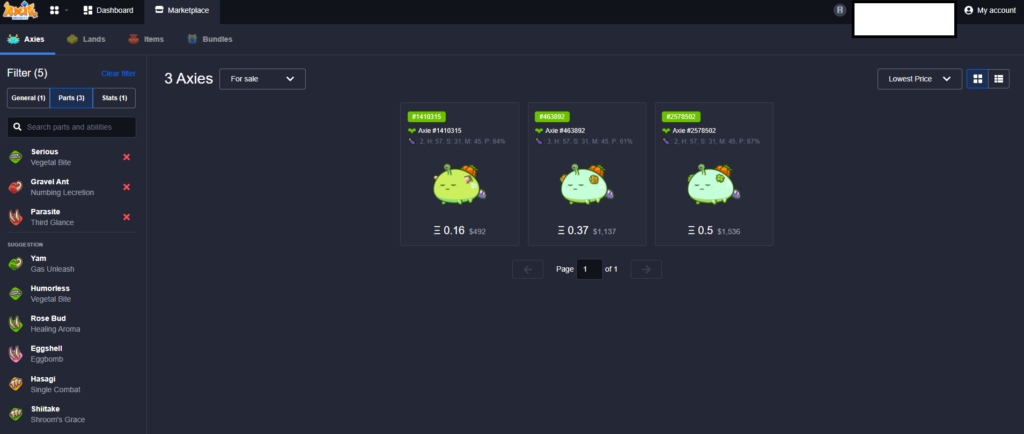
While you are in the marketplace this might be a good idea to browse all available Axies and scout your team. So you know how much money you need to buy all three. Yes that is correct. You will need three axies to play the game.
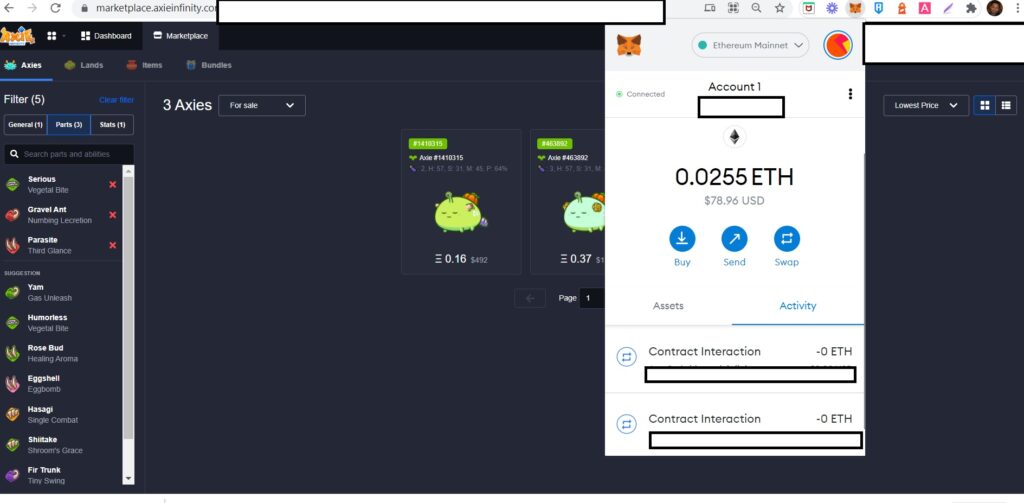
Once you login to the marketplace you will be asked to use meta mask and ronin wallet. This is what your meta mask interface looks like:
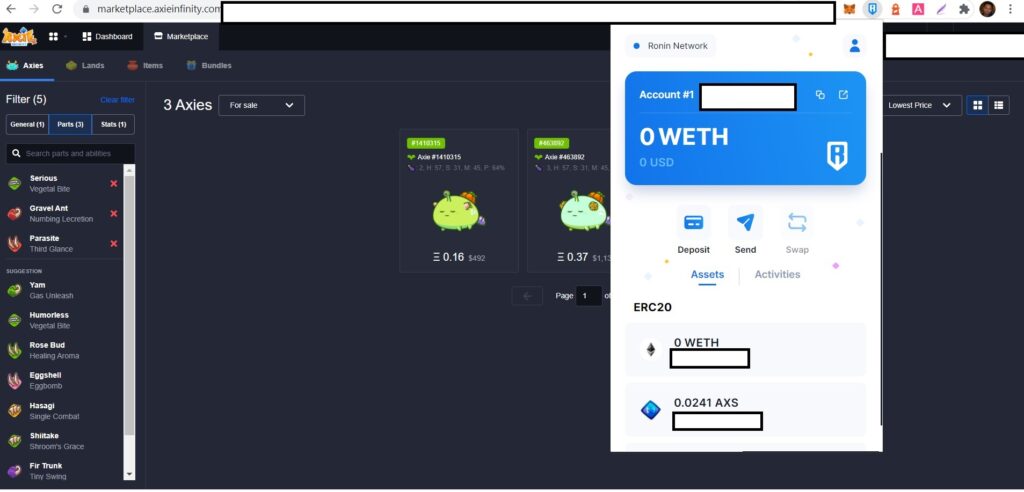
And this is what your ronin wallet should look like.
Now we need to Transfer our ETH from Binance to Meta Mask.
Go Back to Your Wallet, Select Fiat and Spot, Find ETH and Click on Withdraw.
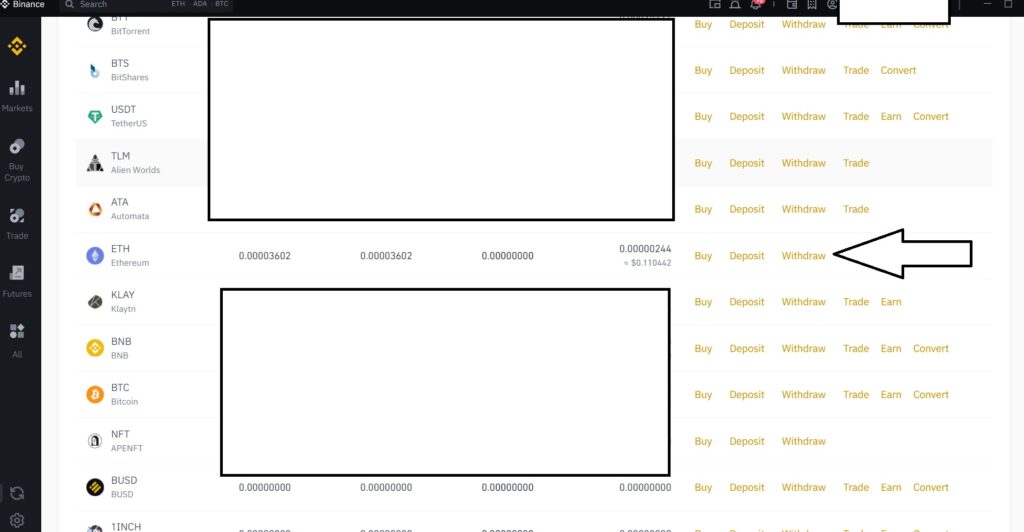
Enter your Meta Mask Address in the address box.
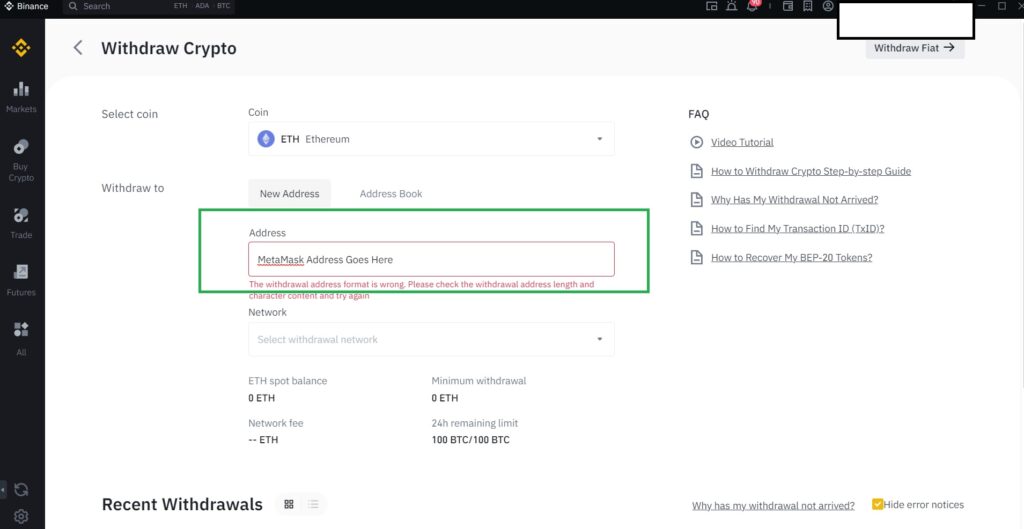
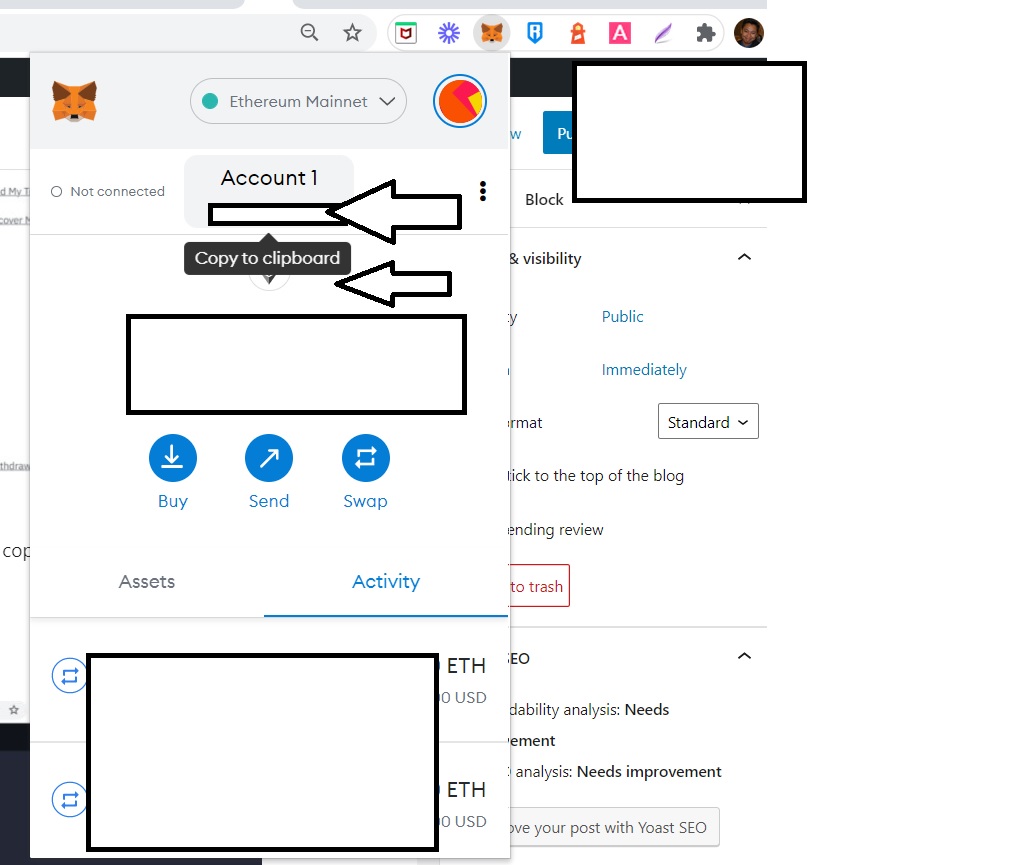
Your Meta Mask address can be accessed using your Meta Mask Extension. Just click the copy button and paste in on the Address section in Binance. Just click on the account button and this will automatically copy your metamask wallet address to your clipboard.
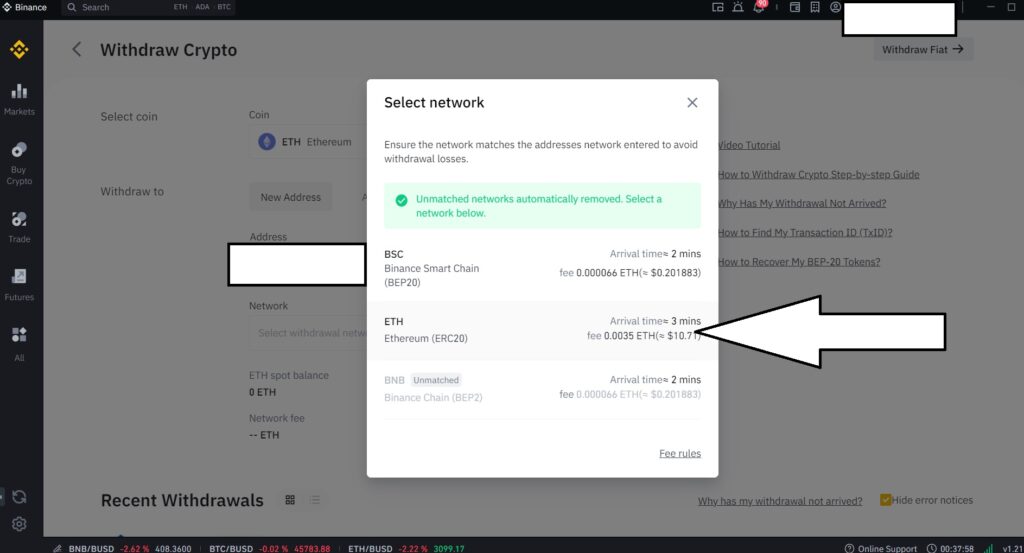
Select ETH (ERC20) and make the transfer. Remember every time you interact or transact with Meta Mask there will be gas fees.
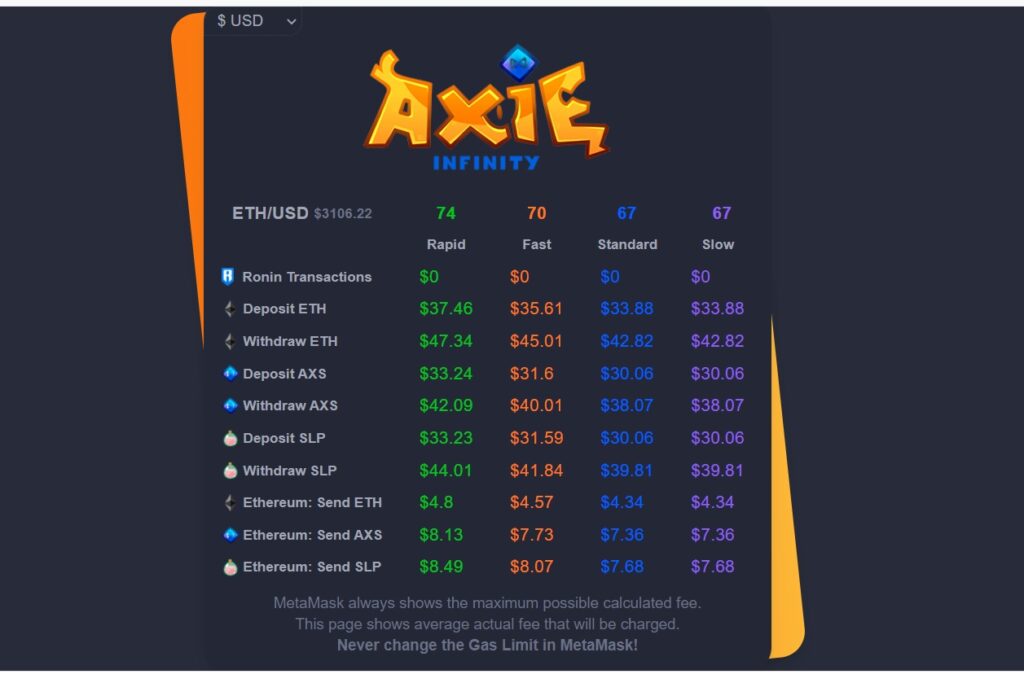
Check your Meta Mask Wallet. Your ETH should be there within 20 minutes or less. Make sure to check for GAS FEES or meta mask charges before you make a transfer. Always make sure to check gas fees here: https://axie.live/
Check Meta Mask. Once you get your ETH in your Meta Mask wallet it is time to go back to the Marketplace.
Login to Marketplace and go to My Account.
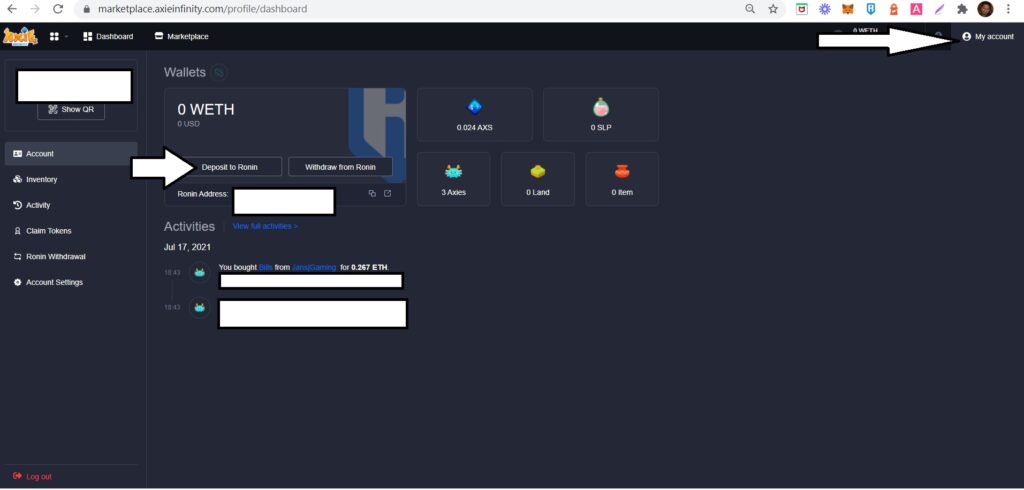
Select Deposit to Ronin.
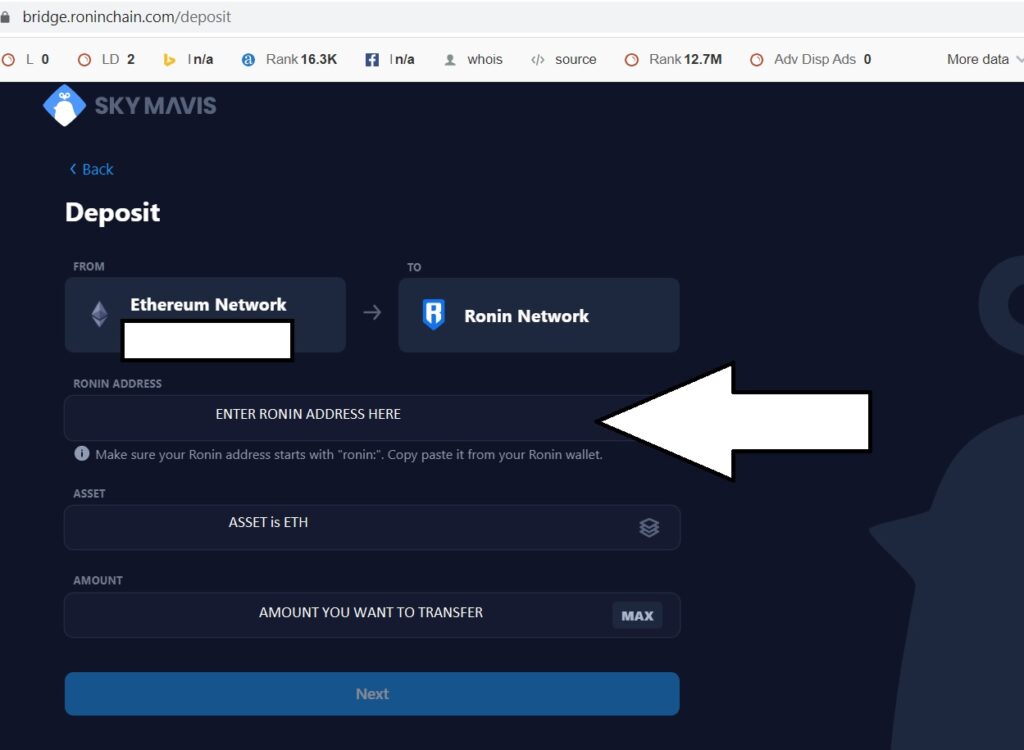
Copy Ronin Wallet Address by accessing your Ronin Wallet Extension. Click on account and copy the address to clipboard. Paste it here in Ronin Address. Select the ASSET. Asset is ETH. And Select the amount you with to transfer. Finally click on next. Wait a few minutes for the transfer. Check your Ronin Wallet for WETH. Once you see that you can now go back to the Marketplace and purchase your first Axie.
Congratulations! You now know how to fund your Axie Infinity Account and you created your account in Axie Infinity.
The last step is downloading Axie Infinity App on your desktop or phone.
How To Download Axie Infinity?
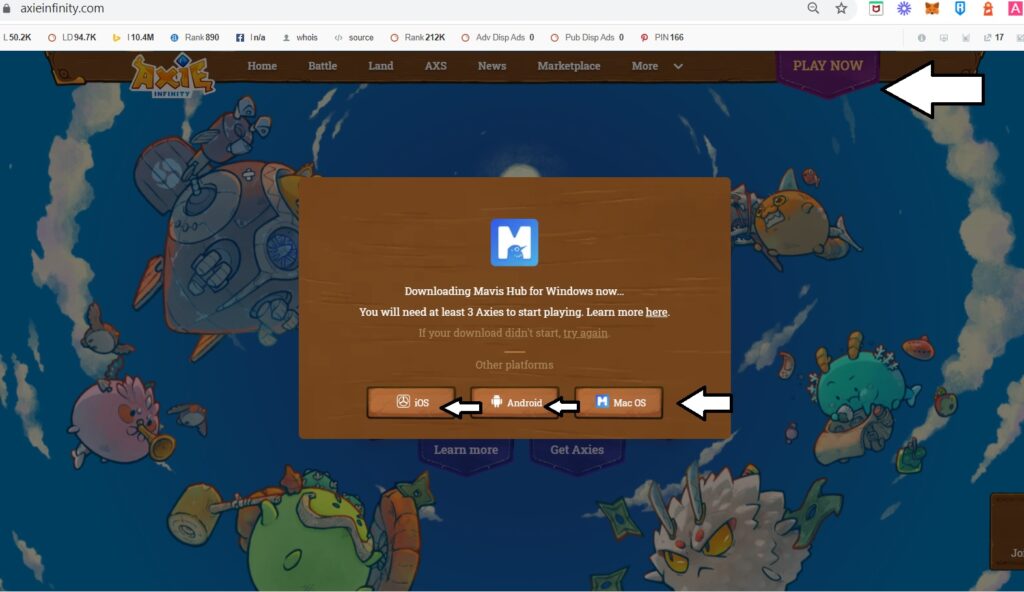
- Go to https://axieinfinity.com/
- Click on PLAY NOW
- Select Device you want to use for installer
- Download
- Install the APP
- Use QR Code or email credentials to login
Congratulations! You are now finished.
I hope this helps! Let me know if you have any questions.
For maximum game performance you might need The Lost SuperFoods.
Recent Posts
- Blockchain Technology in Elections Fintech: A Game-Changer for Democracy February 17, 2023
- How To Create An Account in Axie Infinity Ultimate Guide August 19, 2021
- Can I Transfer Funds from Gcash to Paypal? June 11, 2021
- How to Beat Google Lighthouse and Page Speed May 26, 2021
- How To Buy Wax in Alien Worlds April 19, 2021
- How To Equip the Same Tool in Alien Worlds Crypto Mining Game? April 18, 2021
- How To Create Account in AlienWorlds.IO April 16, 2021
- Apex Legends Season 8 February 3, 2021
- Google Glitch 2020 August 13, 2020
- How to Fix Wifi Issues on Asus 531GD May 22, 2020
- PlayStation 4 Tekken 7 Ultimate Edition First Look July 10, 2019
- Guntank First Look Gundam Battle Operation 2 June 11, 2019
- Gundam Battle Operation 2 All Updates Last 30 Days June 3, 2019
- How To Top Up Your Paypal Account Using GCash May 28, 2019
- WordPress Divi Theme Continue Targeting Switch Error? May 24, 2019
- Weekly Practice with Gunner Gundam & GM Sniper Custom May 22, 2019
- How To Implement CDN on WordPress May 14, 2019
- Gundam Battle Operation 2 Golden Week Update April 29, 2019
- Gunner Gundam First Look Gundam Battle Operation 2 April 27, 2019